Contribution Guidelines
For general info about how to contribute to LinkML, please see FAQ: Contributing.
Development Environment Setup
LinkML is developed with Python and uses uv for dependency management and packaging. If you have not used uv before refer to the uv documentation for installation instructions. Then clone the repository and install the development dependencies:
  git clone https://github.com/linkml/linkml
  cd linkml
  # Full installation (all optional dependencies - same as CI)
  uv sync --all-groups
  # OR lighter development installation (recommended for most development)
  uv sync --group dev
  # OR if you need to run the full test suite locally
  uv sync --group dev --group tests-extra
LinkML Testing Framework
The LinkML test suite can be found in the
testsfolder. The tests are written under specific subfolders within the main aggregatedtests/suite.If you want to formalize your test case into a unit test, you should decide the scope of your test and find the subfolder that the test might best fit under. For example, if your test is related to one of the LinkML generators, then you would create it under the
tests/test_generators/subfolder.There are a few model LinkML schemas within the test suite that you can use while creating your unit tests. You will ideally find them in an
inputdirectory within the scoped tests folder you are looking at. For example, theinputdirectory under thetests/test_generators/subfolder. One of the main test schemas that most LinkML generator related unit tests use is thekitchen_sink.yaml.Outside of generators, users will want to create issue specific unit tests. For that, you need to turn your attention to the
tests/test_issues/folder.The current direction is to first make an issue with specific instructions to reproduce the bug under the issues tab on the main linkml GitHub repo.
Then, create a test case for the above issue, with a minimal test LinkML schema in the input folder of the
tests/test_issues/suite. A minimal test case entails that you only use the elements you need in the schema for your unit test and not bloat the test schema with more elements that necessary.Ideally, it is also advised not to bloat the output folders under each sub test suites with large autogenerated outputs. You can use the Python standard
tests/test_generators/test_excelgen.py.
Directions for creating a unit test
There are two cases you need to consider while writing your unit test. The first one is when you are writing a test for bugs in the LinkML library and the second is for enhancements. For bugs, you would typically create your test case in the tests/test_issues/ folder, whereas for enhancements, you would typically create it in the tests/test_generators/, tests/test_utils/, subfolder.
While creating a test for a bug, you should make a file called
test_linkml_issue_NNN.py. After that it is perhaps easiest to just copy over a test from an existing issue test case and modify it.As discussed above, ideally, all your test issues will have an accompanying minimal test schema. One pattern is that you include the schema in your Python unit test file as strings. Another pattern is to include them as separate YAML files in the
inputfolder.
As for new functionality, as directed above, create a test case under any of the existing Python test files if there are tests already scoped with respect to your enhancement. Or if not, then create a new Python test file with your unit test.
The tests in this repo are a mix of Python unittest tests and pytest tests. See below for more details on the transition. Because of this mix, tests should always be run using the
pytestCLI.If you are using uv (which manages virtual environments automatically), you can use
uv runto run commandsIf you want to isolate specific test functions from within your Python unit test file, then you can use the
-kcommand line option.
To run a single test file using pytest:
uv run pytest tests/test_issues/test_linkml_issue_NNN.py
You can run the full test suite in the following way:
uv run pytest
or via a shortcut Makefile target:
make test
When you create a Pull Request with your unit test on the linkml repo, a GitHub Action run will be set off which runs the entire test suite with the new test case that you added, on that test case branch too.
Note: You will see a number of issues which are named test_issue_NNN.py. The numbers and convention for those
issues are with reference to the old biolinkml issue numbering convention.
Marks
Use marks to run or exclude groups of tests:
network- (currently unused in CI) - tests marked as requiring network access/making network requests in order to succeed.slow- tests that are necessary to test technical correctness but are sufficiently long that it’s worth excluding them during routine development/when running tests locally. By default, tests markedsloware not run, and require the--with-slowflag to run. Slow tests are included in the CI testing action. Typical use is to do most development work without runningslowtests, and then running the full test suite--with-slowbefore submitting or merging a pull request.skip,xfail- see skip and xfail docs
General Tips
Always make sure to use
assertstatements to compare the expected value with the actual value, rather than simply printing or logging the expected and actual values.Avoid using
printstatements for logging purposes. Use theloggingmodule natively provided by Python appropriately with its various logging levels likeDEBUG,INFO,ERROR, etc.You can create a config file by copying the test_config.ini.example to a
test_config.inifile and making changes, for example, to the logging levels:
[test.settings]
DEFAULT_LOG_LEVEL: logging.ERROR
DEFAULT_LOG_LEVEL_TEXT: ERROR
Never hardcode any file paths. Always use import variables such as
INPUT_DIR,OUTPUT_DIRand useos.path.join()to make file paths. This ensures that the tests will run independent of the OS they are running on.Running the test suite may change many files in the
outputfolders accompanying the sub test suites which overloads thegit statuslists with unnecessary file changes. This should be avoided by not adding the output files changed togit status, removing them if they got added automatically, or implement the temporary file solution discussed previously.To ignore the changed files run the shell script
hide_test_changes.sh.To reset all test output files back to original state use the shell script
checkout_outputs.sh.
IDE Tips
PyCharm, IntelliJ:
To run a single test:
Open to Run/Debug
+to add testChoose Python “tests > unittests”
In dialog:
Target: Select Script path, browse to test script
Choose Python interpreter
Click ‘OK’ to save
Run or debug the test from the configurations menu
To run all tests:
Open to Run/Debug
+to add testChoose “Python tests > unittests”
Unittest to pytest conversion
As of August 2023 this project has started converting its test suite from being based on the native unittest module to being based on pytest. Because of the presence of both styles of test in the codebase, it is recommended that you always use pytest to run tests.
New tests in any directory should be written using pytest.
Custom pytest fixtures
input_pathThis fixture provides a factory function to get the path to a file within theinputdirectory adjacent to the current test file. So for example with this file structure:tests └── test_foo ├── input │ └── schema_a.yaml └── test_foo_feature_a.pyYou would access
schema_a.yamlwithin your test like:# test_foo_feature_a.py def test_feature_a(input_path): path_to_schema = input_path("schema_a.yaml")
snapshotThis fixture provides a way of comparing a string, temporary file, or temporary directory to a known, good artifact. The artifacts are stored in a directory called__snapshots__alongside the test.Warning: snapshot testing can be very powerful, but it can also lead to brittle tests. You should seriously consider alternatives before writing this type of test.
If you make a change that intentionally causes some output to not match the saved snapshot file(s), you should update the snapshots by running
pytestwith the--generate-snapshotsflag. You should try to run only a single or small group of tests with this flag (as opposed to the entire test suite). An exception to this rule is when preparing a new minor version of linkml after the metamodel changes, changes to the metamodel can have many (inconsequential) changes to multiple snapshots. The updated snapshot files should be checked in to Git alongside your other code changes.Debugging tip: sometimes a snapshot-based test may fail on GitHub actions, but may appear to pass locally. This can happen if the test is marked as a slow test, in which case you may need to use
--generate-snapshotsin combination with--with-slow(see below).
Testing linkml PRs with development versions of linkml-runtime
linkml is tightly coupled to upstream linkml-runtime.
In some circumstances, paired changes need to be made against both linkml and linkml-runtime.
Then testing with the last release of linkml-runtime is insufficient.
In such cases, you can specify that your PR needs to be tested with a specific linkml-runtime branch and repository. Specifying this information in the first two lines of your pull request´s opening message like this:
upstream_repo: user-or-org-name/linkml-runtime
upstream_branch: some-complicated-featureHey everyone … (PR continues)
The order of the lines with upstream_repo and upstream_branch tags does not matter,
but they must be the first two lines of the pull request comment.
Maintainers can also specify upstream branches to test against when dispatching the test_with_unreleased_runtime workflow manually via the GUI prompt.
Testing against an unverified upstream branch is not necessarily dangerous. The input is stored as a variable first and not executed as untrusted code. But maintainers should take care to verify that the upstream branch and repo are correct and expected given the context of the PR.
Testing linkml-runtime PRs against any upstream linkml repository/branch
For linkml-runtime a similar action as above is available allowing you to select a linkml repository to test against. For more see linkml-runtime/CONTRIBUTING.
Code formatting and linting
This repository is configured to use Black and Ruff to ensure good formatting and code quality standards.
Each of these tools can be run on-demand via tox. To check the code for issues run:
uv run tox -e lint
Any issues should be fixed before committing or pushing changes. This command is automatically run against pull requests and the testing workflow will fail if issues are found.
Formatting and some code quality issues can be fixed automatically by running:
uv run tox -e format
You can configure these tools to run automatically before each commit by using pre-commit. To set this up, first ensure that you have the pre-commit package installed globally. This can be done via pipx:
pipx install pre-commit
Or one of their other supported installation options.
Then to enable the pre-commit hooks in this repository run:
pre-commit install
Now each git commit will trigger a check of the files staged in that commit and block the commit if issues were found. In an emergency you can bypass the pre-commit hooks by using the --no-verify flag on git commit.
Release to PyPI
A GitHub action is set up to automatically release the package to PyPI. When it is ready for a new release, create a GitHub release. The version should be in the vX.X.X format following the semantic versioning specification.
Release notes should always be autogenerated (just click the “generate release notes” button) - these can be tweaked but the emphasis should be on making sure PR titles and githu issue titles are clear and concise. Note we don’t keep a separate CHANGELOG file, it all goes in the release notes.
After the release is created, the GitHub action will be triggered to publish to PyPI. The release version will be used to create the PyPI package.
If the PyPI release failed, make fixes, delete the GitHub release, and recreate a release with the same version again.
GitHub Best Practices
PRs
PRs should be in a DRAFT state until they are ready for review and tests are passing.
PRs should be reviewed by at least one other person.
All automated tests should be passing via GitHub actions before a code review is requested.
Reviews can be requested of any contributing member of the LinkML organization.
Make a DRAFT PR for your branch even if you’ve just started working on something. This gives other developers insight into your work and allows them to provide feedback early on.
In general, each PR should be associated with a ticket.
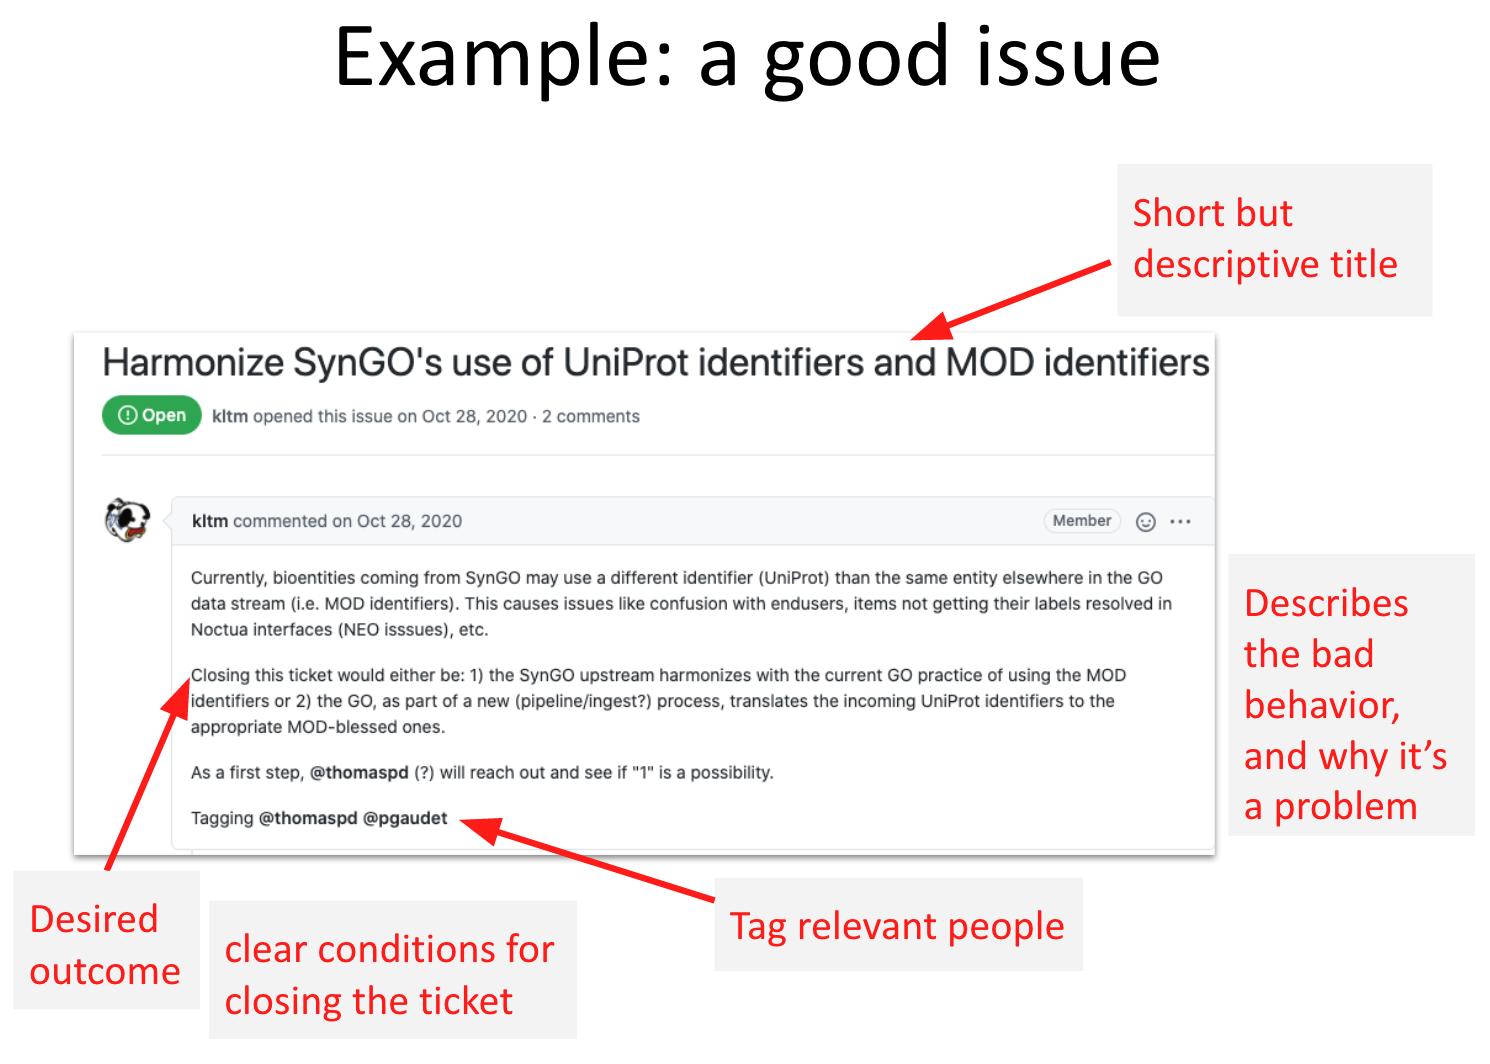
Ticket/Issue Creation
Search existing issues before creating a new one.
Give your issue a short but actionable title
Describe the problem and the context and include a repeatable example.
Clearly state what needs to be done to close the ticket.
Example of a Good Issue:
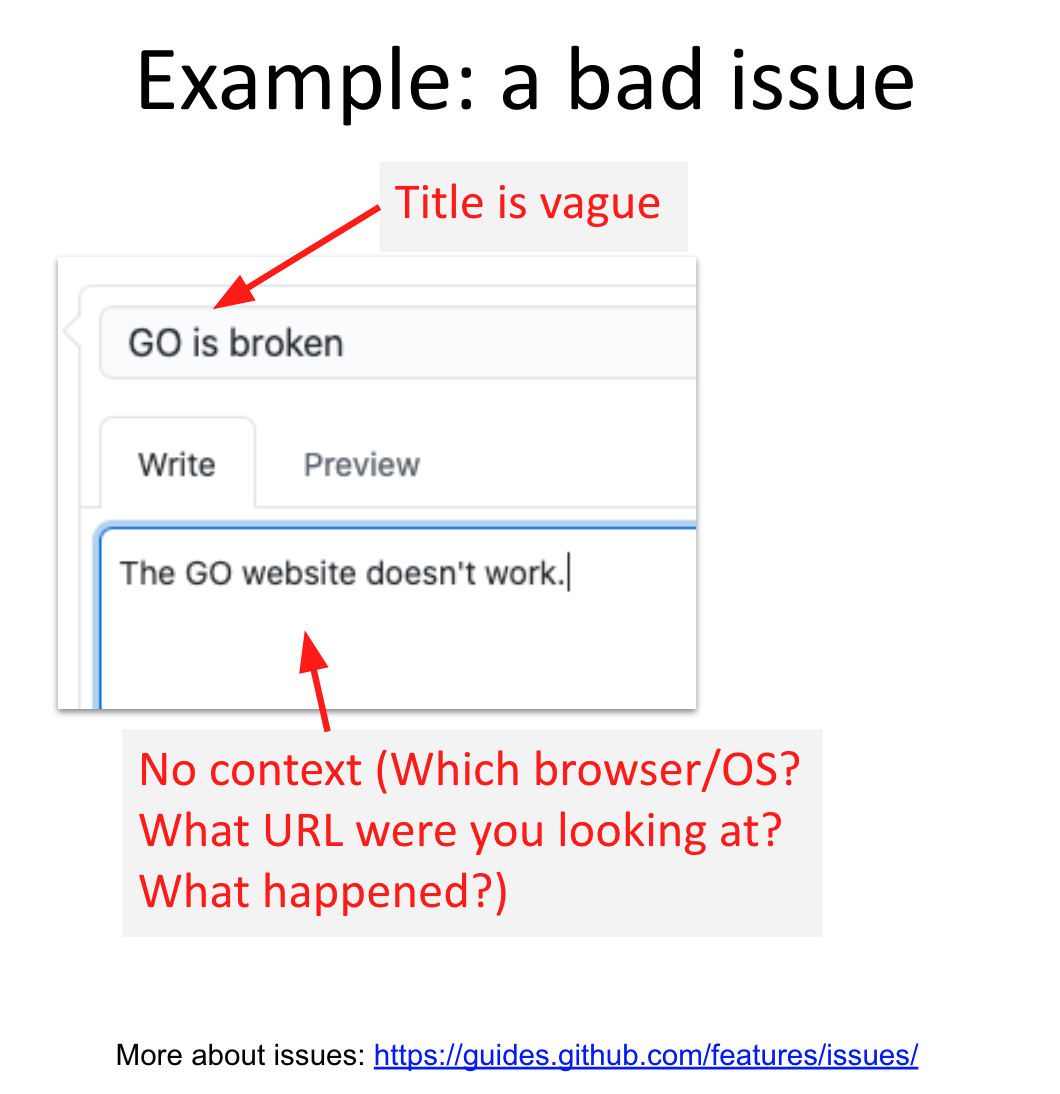
Example of a Bad Issue:
See Also
FAQ: Contributing - General info about how to contribute to LinkML.
Deprecation - Handling deprecations